Beehive splitting is a vital aspect of colony management that every hobby beekeeper should understand. It’s the process of creating a new hive from an existing one, helping to increase your number of colonies and prevent swarming.
But why is it so important?
Imagine you’re tending to your backyard garden. As your plants grow and thrive, you might take cuttings to create new plants. Beehive splitting works in a similar way, allowing you to grow your apiary and maintain healthy colonies.
For instance, let’s say you started with one thriving hive in your backyard. By learning to split, you could potentially double your colonies each year, turning that single hive into two, then four, and so on.
This skill not only helps you expand your beekeeping hobby but also contributes to the overall health of honey bee populations. As a new beekeeper, mastering this technique will significantly enhance your beekeeping journey.
Remember, beekeeping isn’t just about honey production. It’s about understanding and working with these fascinating creatures. Splitting hives allows you to dive deeper into bee behavior and colony dynamics.
Beehive splitting is a fundamental skill for hobby beekeepers, enabling colony expansion, swarm prevention, and a deeper understanding of honey bee behavior.
RELATED: Bee Hive Guide: Types & Maintenance Tips
The Importance of Timing in Beehive Splitting
When it comes to beehive splitting, timing is everything. Just like planting a garden, there’s a right time and a wrong time to split your hives.
But when exactly is the best time to split?
In most parts of the United States, the ideal time is during the warm summer months. Why? Because this is when your colonies are at their strongest and resources are abundant.
Imagine trying to move to a new house in the dead of winter. It would be challenging, right? The same goes for bees. They need favorable conditions to establish a new colony successfully.
However, if you live in a warm climate, you might have more flexibility. In places like Florida or California, beekeepers often have two optimal splitting times – during the nectar season and in the cooler months.
Let’s break this down further:
Ideal Conditions for Early Splitting
Early splitting can be done when your hive shows these signs:
1. A minimum of 4 frames of brood
2. Presence of drone cells
3. Ability to provide or purchase a queen
For example, if you check your hive in early spring and find it buzzing with activity, with frames full of brood and honey, it might be ready for an early split.
Remember, your split needs to have its own queen. If you can’t provide one, make sure the split has young larvae so the bees can raise their own queen.
Late Splitting Considerations
Be cautious about splitting too late in the season. As a general rule, avoid splitting when the nectar season is winding down, typically early August in many parts of the United States.
Why? Late splits might struggle to build up enough resources for winter. It’s like trying to stock up for a long trip just as the stores are closing – not ideal!
However, in some warm climates, late splitting can work. For instance, commercial beekeepers in Hawaii often split in November to maximize honey production.
The best time for beehive splitting varies based on your location and climate, with early summer being ideal in most regions, while considering local conditions and nectar flows for optimal success.
RELATED: Bee Nest Types: Unraveling the Fascinating Diversity of Bee Homes
Essential Resources for Successful Beehive Splitting
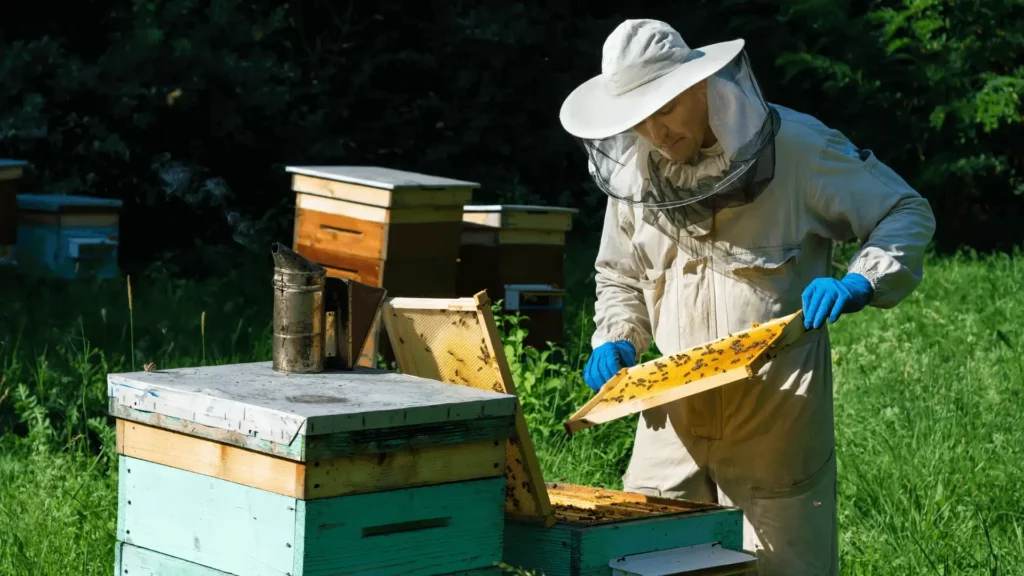
Before you dive into splitting your beehive, it’s crucial to gather all the necessary resources. Think of it as packing for a camping trip – you wouldn’t set out without the right gear, would you?
Here’s what you’ll need for a successful split:
1. A new hive setup: This includes a bottom board, boxes, frames, and a top cover.
2. Frames of brood: Aim for at least 4-5 frames of brood in various stages of development.
3. Frames of honey and pollen: These provide essential food for the new colony.
4. A queen or the resources to raise one: This could be a purchased queen, queen cells, or young larvae for the bees to raise their own queen.
5. Additional bees: You’ll need enough worker bees to care for the brood and forage for the new colony.
Let’s put this into perspective. Imagine you’re helping a friend move to a new apartment. You wouldn’t just drop them off with empty rooms, right? They’d need furniture, food in the fridge, and all the essentials to start their new life. It’s the same for your bees!
For example, if you’re splitting a strong hive with two deep boxes, you might take:
– 2-3 frames of capped brood
– 1-2 frames of eggs and young larvae
– 1-2 frames of honey and pollen
– 1-2 frames of empty drawn comb
– Enough bees to cover all these frames
Remember, the amount of resources you take depends on the strength of your original hive and your splitting method. Always ensure you leave enough resources in the parent hive too!
Successful beehive splitting requires careful preparation and allocation of resources, including frames of brood, honey, pollen, and enough bees to support the new colony’s growth.
Two Primary Methods of Beehive Splitting
When it comes to splitting your beehive, you have two main options. It’s like choosing between two paths in a forest – both will get you to your destination, but the journey will be slightly different.
Let’s explore these methods:
Moving the Current Queen to the Split
In this method, you’re essentially creating a new home for your existing queen and some of her workers. Here’s how it typically works:
1. Locate the queen in your original hive.
2. Gently move her, along with the frame she’s on, into the new hive box.
3. Add 2-3 additional frames of brood, honey, and pollen from the original hive.
4. Shake in extra bees from a couple more frames to ensure the new split has enough workers.
This method is like moving the matriarch of a family to a new house with some of her children. The original hive will then raise a new queen from the eggs left behind.
For example, if you have a particularly productive queen that you want to preserve, this method allows you to keep her genetics in play while also expanding your apiary.
However, be aware that the colony exit (when bees leave the hive) might be stronger in the new split since the bees will follow their familiar queen.
Keeping the Queen in the Original Hive
Alternatively, you can leave the queen in the original hive and create a split with just brood, honey, and worker bees. Here’s the process:
1. Leave the queen in the original hive.
2. Move 3-4 frames of brood (ensure some contain eggs or very young larvae) to the new hive.
3. Add 1-2 frames of honey and pollen.
4. Shake in extra bees from additional frames.
This is like setting up a new household for some of the children, who will then raise their own matriarch (new queen).
For instance, if you’re more interested in allowing the bees to raise their own queen, this method gives them that opportunity. It’s a great way to see how your bees perform this crucial task.
In both methods, queen acceptance is crucial. Whether you’re introducing a new queen to the original hive or waiting for the split to raise its own, monitor the process closely to ensure success.
Remember, there may be new legal restrictions in your area regarding queen rearing or introduction, so always check local regulations.
The two primary methods of beehive splitting – moving the current queen or keeping her in the original hive – each have unique advantages and considerations, allowing beekeepers to choose based on their specific goals and circumstances.
RELATED: Revolutionize Bee Feeding: 7 Reasons Why the Bucket Bee Raft Is a Game-Changer for Beekeepers
Step-by-Step Guide to Splitting a Beehive
Ready to dive into the exciting world of beehive splitting? Let’s break it down into manageable steps. Think of it as following a recipe – each step is crucial for the perfect result.
Step 1: Assess Hive Strength
Before you even think about splitting, you need to ensure your single colony is strong enough. Here’s what to look for:
– At least 8-10 frames of bees
– 4-6 frames of brood in various stages
– Plenty of honey and pollen stores
Imagine you’re planning to divide your garden. You wouldn’t do it if your plants were struggling, right? The same applies to your bees.
Step 2: Prepare Equipment
Gather all necessary equipment before you start. You’ll need:
– A new hive setup (bottom board, boxes, frames, top cover)
– Hive tool
– Smoker
– Protective gear
This is part of the beekeeper’s property – your tools of the trade. Having everything ready is like a chef preparing their mise en place before cooking.
Step 3: Choose Your Splitting Method
Decide whether you’ll move the current queen to the split or keep her in the original hive. This choice will guide your next steps.
For example, if you have a particularly productive queen, you might choose to move her to the new hive to spread her genetics.
Step 4: Select Frames for the Split
Choose frames that will give the new hive the best start:
– 2-3 frames of brood (ensure some eggs and young larvae)
– 1-2 frames of honey and pollen
– 1-2 empty drawn combs
This mix of resources is like packing a suitcase for a long trip – you need a bit of everything!
Step 5: Introduce or Create a New Queen
If you moved the old queen, the original hive will need to raise its own queen. If you kept the old queen, you’ll need to introduce a new queen to the split or let them raise their own.
Remember, queen acceptance is crucial. Monitor this process closely.
Step 6: Monitor the New Split
In the weeks following the split, keep a close eye on both hives. Look for:
– Signs of a laying queen
– Increasing brood patterns
– Adequate food stores
This is like checking on a newly planted garden – frequent monitoring ensures everything is growing as it should.
Step 7: Provide Adequate Resources
Both hives may need supplemental feeding, especially if nectar flow is low. Consider providing sugar syrup or pollen patties.
Think of this as watering and fertilizing your garden to give it the best chance of thriving.
Step 8: Manage Space in Both Hives
As both colonies grow, ensure they have enough space. Add boxes as needed to prevent overcrowding.
It’s like giving a growing family more rooms in their house – everyone needs space to thrive!
Step 9: Watch for Pest and Disease Issues
Split hives can be more vulnerable to pests and diseases. Regular inspections are crucial.
Look out for:
– Varroa mites
– Small hive beetles
– Signs of diseases like American Foulbrood
Early detection is key, just like spotting weeds in your garden before they take over.
Step 10: Evaluate Split Success
After about 4-6 weeks, assess both hives. Look for:
– A laying queen
– Growing population
– Increasing honey and pollen stores
This is your report card – how well did your split perform?
Step 11: Adjust as Necessary
Based on your evaluation, make any needed adjustments. This might include:
– Requeening if necessary
– Combining weak hives
– Providing additional resources
Flexibility is key in beekeeping, just like in any hobby or skill.
Step 12: Prepare for Honey Production
Once both hives are established, start thinking about honey production. Add supers as needed.
Imagine the satisfaction of harvesting honey from two hives instead of one!
Step 13: Plan for Future Splits
Success with this split? Start planning for the next one! Each split is a learning experience that will make you a better beekeeper.
Successful beehive splitting requires careful planning, execution, and monitoring, with each step building on the last to ensure healthy, thriving colonies.
RELATED: Bee Swarm vs. Supersedure Cells: Master Queen Cell Management in Your Beehive [Expert Guide]
Benefits of Beehive Splitting
Splitting your beehive isn’t just about increasing your colony count. It’s a practice that offers a multitude of benefits, enhancing both your beekeeping experience and the health of your bees.
Let’s explore some of these advantages:
1. Increased honey production: More hives often mean more honey. Imagine doubling your honey harvest each year!
2. Swarm prevention: By splitting proactively, you give your bees more space, reducing their urge to swarm.
3. Genetic diversity: Creating new colonies allows for the introduction of new queens, potentially improving the genetic strength of your apiary.
4. Disease control: Splitting can help break the brood cycle, which can be beneficial in controlling certain pests and diseases.
5. Learning opportunity: Each split is a chance to deepen your understanding of honey bee biology and behavior.
6. Sustainability: By creating new colonies, you’re contributing to the overall health of honey bee populations.
For example, let’s say you started with one hive that produced 50 pounds of honey. After splitting and successfully establishing two strong colonies, you might find yourself harvesting 80-100 pounds of honey the following year!
Moreover, the enjoyment of beekeeping often increases with each split. It’s like watching your garden grow and flourish – there’s a sense of accomplishment in seeing your apiary expand.
Remember, the goal isn’t just to have more hives, but to have strong, healthy colonies. Quality always trumps quantity in beekeeping.
Beehive splitting offers numerous benefits, including increased honey production, swarm prevention, improved genetic diversity, and enhanced learning opportunities for beekeepers.
Challenges and Solutions in Beehive Splitting
While beehive splitting can be rewarding, it’s not without its challenges. But don’t worry! Every challenge has a solution. Let’s explore some common hurdles and how to overcome them:
Challenge 1: Queen Acceptance
Problem: The new queen isn’t accepted by the split hive.
Solution: Ensure proper introduction techniques. Use a queen cage and allow workers to slowly release her. Monitor closely for signs of acceptance.
Challenge 2: Weak Split
Problem: The split hive isn’t thriving as expected.
Solution: Boost the split with additional frames of brood and bees from strong colonies. Consider combining weak splits.
Challenge 3: Robbing
Problem: Stronger hives attempt to rob resources from the weaker split.
Solution: Use entrance reducers, especially in times of dearth. Consider moving the split to a different location temporarily.
Challenge 4: Disease Spread
Problem: Splitting inadvertently spreads diseases or pests.
Solution: Always inspect frames carefully before splitting. Treat for varroa mites and other pests proactively.
Challenge 5: Timing Issues
Problem: Splitting too early or too late in the season.
Solution: Learn your local climate and nectar flows. Consult with experienced local beekeepers or join a local club for region-specific advice.
Remember, every new beekeeper faces these challenges. It’s part of the learning process! For instance, I once had a split that seemed to be failing. By adding a frame of brood from a strong hive each week for three weeks, I was able to turn it around into a thriving colony.
The key is to stay observant and be ready to adapt. Keep learning, keep experimenting, and don’t be afraid to ask for help when needed. That’s the best management practice in beekeeping!
While beehive splitting presents challenges such as queen acceptance and weak splits, proactive management, continuous learning, and adaptability are key to overcoming these hurdles and ensuring successful splits.
RELATED: Bee Hive Beetles: Identification, Life Cycle, And Control Methods
Regional Considerations for Beehive Splitting
Beekeeping isn’t one-size-fits-all, especially when it comes to splitting hives. Your location plays a crucial role in determining the best practices for your apiary.
Let’s explore some regional considerations:
Warm Climate Regions
In areas like Florida, Texas, or California, beekeepers often have more flexibility in splitting times. For example:
– You might be able to split hives twice a year – once in spring and once in fall.
– Winter preparations may be less intensive, allowing for later splits.
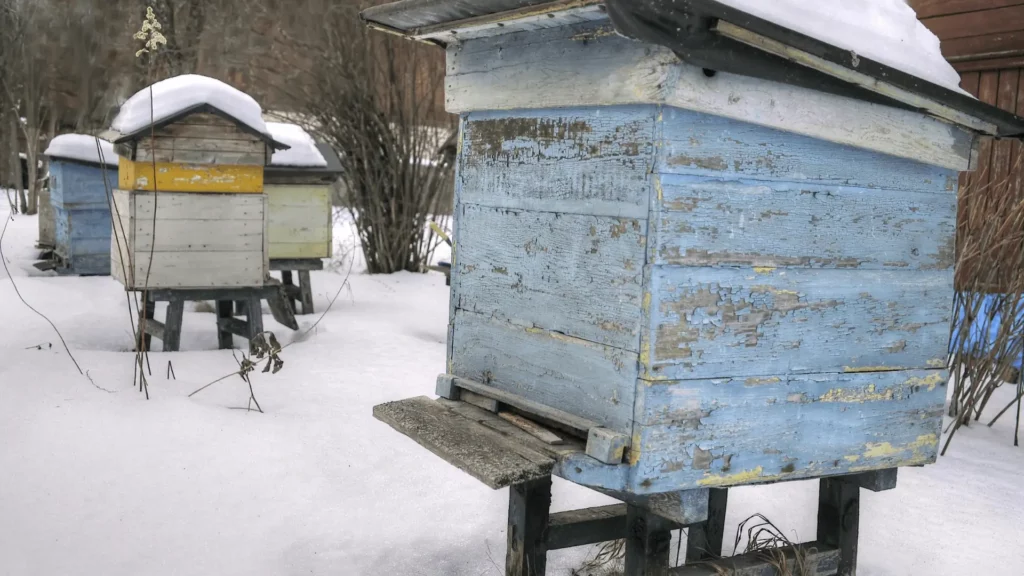
Northern United States
Beekeepers in colder regions face different challenges:
– The splitting window is typically shorter, often limited to late spring or early summer.
– Splits need more time to build up before winter, so earlier is usually better.
Coastal Areas
Coastal beekeepers might need to consider:
– Salt air effects on equipment
– Potential for extreme weather events like hurricanes
Urban vs. Rural Areas
Your specific location within a region matters too:
– Urban beekeepers might need to be more mindful of neighbors when splitting hives.
– Rural beekeepers may have more flexibility in hive placement and management.
Remember, local knowledge is invaluable. Joining a local club or regional bee association can provide you with area-specific insights that you won’t find in general beekeeping guides.
For instance, a beekeeper in Minnesota might split hives in May, while one in Georgia could safely split in April. These timing differences can significantly impact the success of your splits.
Always adapt general guidelines to your specific climate and conditions.
Conclusion
As we wrap up our journey through the art of beehive splitting, it’s clear that this essential skill is a game-changer for hobby beekeepers. By mastering these 13 steps, you’re not just expanding your apiary; you’re contributing to the health and sustainability of honey bee populations. Remember, successful splitting requires patience, careful timing, and a deep understanding of your colony’s needs.
Whether you’re preventing swarms, increasing honey production, or simply enjoying the fascinating world of beekeeping, splitting hives opens up exciting possibilities. Don’t forget to connect with your local beekeeping community and stay updated on current research to refine your techniques further.
As you embark on your splitting adventures, keep in mind the legal and ethical considerations, especially if you’re a residential beekeeper. With practice and dedication, you’ll soon find yourself confidently managing multiple thriving colonies. So, gear up, apply these steps, and watch your beekeeping journey flourish. Happy splitting!